
Newtonian Collimation
The first section deals with manual collimation.
The second section deals with collimating using a laser collimation tool.
I would advise you to read all of the methods and details on this page to get a real feel for what you are doing before you start adjusting your telescope.
If you are new to Newtonian telescopes: Please read...
OK - So you've bought yourself a nice reflector of the Newtonian variety and you suspect that it may be out of alignment. (Stars look like comets with spikes off to one side!) Most telescopes will be pretty well collimated even straight out of the box - If you start messing around, you could spoil your viewing for weeks before you can get someone who knows what they're doing to set you right! Only attempt collimation if you can see that the image is horrible! If the image looks OK - Leave it alone is my advice!
Collimation is the process by which the optics are aligned to bring the column of light exactly down the centerline of the optical
components.
If your stars are wonky and you're concerned, try to get someone from a local astronomical society to have a look at it for you. Failing that, as a last
resort, and if you're sure you understand these instructions, you could try it yourself - Though I wouldn't recommend it unless it's a spare telescope that you plan to experiment on!
However, it's something that anyone with a bit of common sense can tackle and you get better with experience!
PLEASE DON'T ENTER INTO ADJUSTING YOUR TELESCOPE UNLESS YOU ARE SURE YOU UNDERSTAND THE PRINCIPLES AND CAN ACCURATELY FOLLOW THESE SIMPLE
INSTRUCTIONS!
If not - Ask at your local astronomical society for help!
Reminder: Please read through all of this guide before attempting any adjustments.
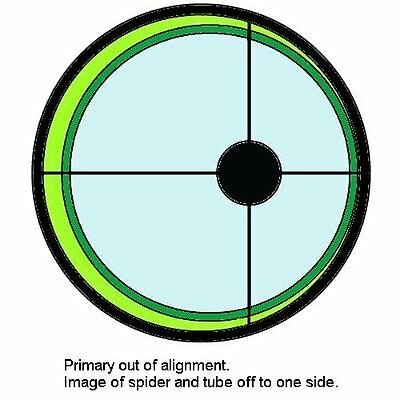
The Image in the Eyepiece
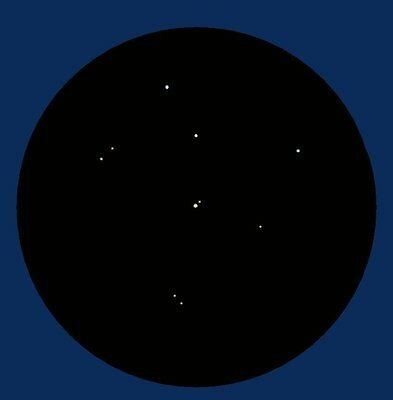
Here are a couple of pictures. One showing star images in a properly aligned telescope and one that is well out of collimation.
If the star images are reasonably nice pin-points then no collimation is necessary.
Left: This telescope has nice sharp points of light when viewing the stars. It is in good collimation and no adjustment is necessary.
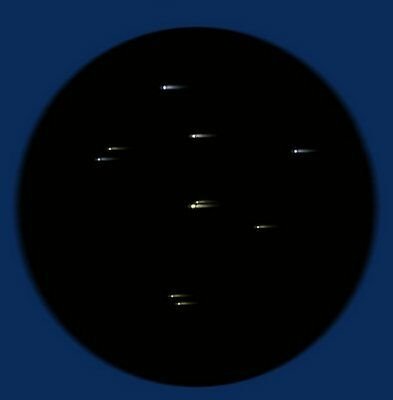
Left: The optics of this telescope are wildly out of alignment. The stars look like little comets! Collimation is necessary in this telescope.
Your Newtonian may need collimating if you can't split the double stars you should be able to or if the planets have a dusky halo around them and look 'cloudy'.
Assessing your telescope's collimation:
OK : Let's check things out. The first thing to do is have a careful look at a 'high magnification' 3rd or 4th magnitude star image at night to see if there are any tails. (Don't use a star that is too bright or you will see confusing spikes) If there is a hint of fuzzy tails on one side, then you do need to think about collimating your optics.
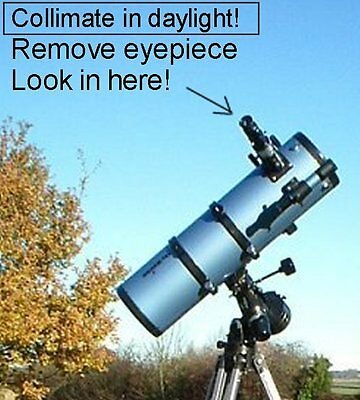
Once you have observed that you need to collimate - Do the collimation in daylight initially! The best confirmation of
collimation is observing a star, but first things first...
If you choose to have a go yourself (having read this guide and the warnings above), the first thing you need to do is check to see if everything is nice and
concentric when you look into the draw-tube (Where you put the eyepiece) when you don't have an eyepiece in.
This is done by removing the eyepiece and looking into the draw-tube as if you were using the telescope in daylight with the telescope pointing toward something reasonably bland and light coloured - a White wall / Blue sky / Grey building etc.
ALWAYS DO YOUR COLLIMATION ADJUSTMENTS WITH THE TELESCOPE REASONABLY HORIZONTAL SO THAT NOTHING CAN FALL ONTO THE TELESCOPE
MIRROR!
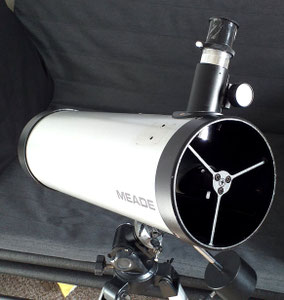
Start by making sure the spider and secondary mount are secure. The secondary mirror should be firm when you touch the secondary mounting. If anything wobbles or moves you'll need to gently tighten the spider bolts or the central secondary bolt to make sure there is no play in the secondary mirror support mechanism. (See pic in Laser Collimation section, screws A & B)
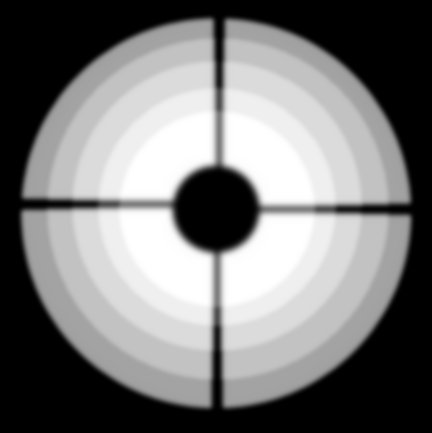
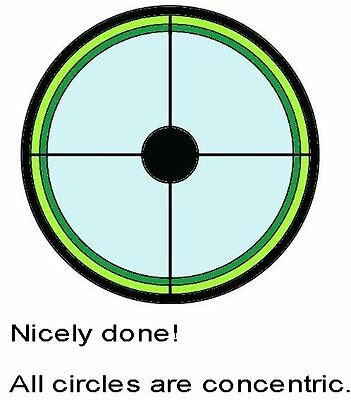
What you should see.
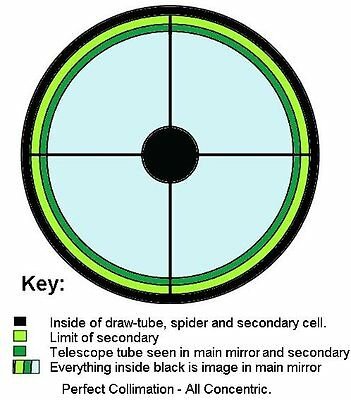
Left: If everything is nicely symmetrical and concentric, as seen in the illustration, then all should be well for viewing.
If anything is not concentric please read on.
If the view resembles either of the pictures below we have some work to do!

LEFT: The view into the drawtube of my SkyWatcher 200P Newtonian. You see everything nice and concentric.
If your telescope has a similar appearance then we're set to go. If the various reflections and tubes are not concentric then we have some work to do - Please read on!

It is very important that your eye is in the center of the draw-tube when you observe the concentricity of the various mirrors. I use my draw-tube dust cap which I have drilled a 2.5mm hole exactly in the center of. This pushes into the draw-tube and only allows me to see into it in the center. If you have a dust cover you could do the same. (Tape it over when being used as a dust cover if it makes you feel better!)
There are 'collimating eyepieces' and 'laser collimators' commercially available (See later in this guide). They do the same job, for a price! I would
always advocate the simplest method, as the results are the same, though the outlay is very much less. If the simple method doesn't work for you, by all means invest in a laser collimator -
There's no need to have poor images for the sake of a few quid! My most recent was bought new for £17 in 2019. They have gone up a bit but not too much since.
Adjustment:
If your telescope is not in correct collimation you will need to make some adjustments.
Always start by looking at the image of the spider in the main mirror, (as seen in the secondary mirror by looking into the draw-tube).
If the spider is central in the main mirror then it's a matter of adjusting the secondary to make everything concentric.
Left: If the secondary mirror is not central in the main: Start by adjusting the main mirror until the secondary is concentric with the
telescope tube.
Then move on to adjust the secondary mirror so that the spider appears in the center of the secondary and the main mirror.

Left: If the image of the spider is central in the main mirror, then it is the secondary mirror that needs adjustement to bring all parts into concentricity.
You can see in the illustration that the secondary is in the center of the main mirror, but that the image of the main mirror is off to the bottom right. We need to adjust the secondary mirror to bring the image of the main into the centre of the tube.

Right:
When you look into the draw-tube, without the collimating eye-cap, at the reflection in the secondary you should see your eye looking back. Your eye should also be central in the secondary mirror if you have done your collimation correctly.
However: Do not think you can skip the stages above and just align your eye in the centre of the secondary and all will be well. Your eye has to be exactly in the centre of the draw-tube. This is done by using the collimation eye-cap.
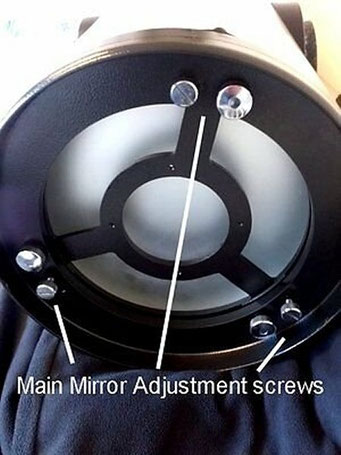
Adjustments: PRIMARY
Most Newtonian telescopes over 100mm have adjustment of the primary. However, some are factory set and should always be 'close enough!'
Both mirrors, Primary (Main mirror) and certainly the Secondary have three screws for adjustment. (Usually with lock-nuts).
These are spread at 120 degree intervals round the mirror at about 1/4 of the way in from the outer edge.
Always make very small adjustments and look to see what effect the adjustment is having. You may find that you have to loosen one screw before tightening the
next to give the mechanicals some leeway to move.
It can be advantageous to have a helper to do the adjustments while you observe the movement of the mirrors. (Unless you have a laser collimator!)
Don't forget: lightly tighten the lock-nuts once finished while checking again to make sure
nothing goes back out of adjustment!
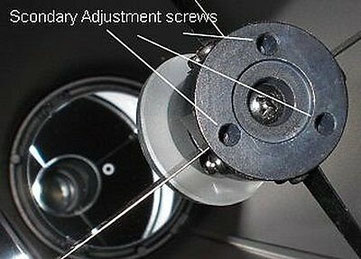
Adjustments: SECONDARY
The secondary mirror cell in the centre of the spider has similar adjustment screws. These adjust the exact direction of the light cone as it passes from the
centerline of the tube to the eyepiece.
NOTE: The little circular ring on the main mirror in the illustration. Many manufacturers add this helpful mark on the centre of the primary. (IN
the case of Celestron, this marker indicates that your mirror is parabolic). The little donut marker helps your eye get everything centered. This is an unused portion of the main mirror so
the alignment aid doesn't affect your telescope's performance. It is in the shadow of the secondary.
The central bolt (seen here between the three adjustment screws) should be firmly but gently tight, otherwise the secondary can move about.
A Quick Way to Check Your Collimation in an emergency situation.
Imagine you're observing something but the image is awful. What can you do at three in the morning when the event you want to see is imminent?
Find a bright star and defocus the image until it looks like the image at left.
Find a star and defocus the scope. Carefully observe if the shadow of the secondary is in the centre of the defocused image. If it is not, then you can make adjustments (Usually to the primary but sometyimes both) to bring the out of focus disc concentric with the spider and secondary shadow...
Left: This telescope is in good collimation.
This is a quick and easy test for assessing your collimation at any time, when you're out under the sparkly black stuff.
(This is the easiest way to collimate a Cat-Newt ' Bird-Jones' telescope if you've made the awful mistake of buying one!)
All Finished!
Left: Your telescope is collimated when all the required and visible parts of the optical system are concentric.
Your stars will pack all their light into the smallest point possible and your image will have the most detail and the brightest stars. You will be able to split the closest doubles and your observing will be more enjoyable.
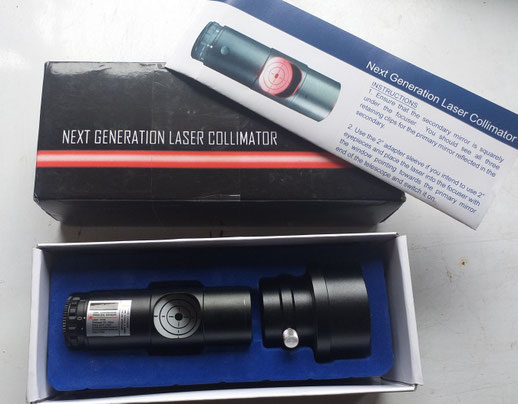
Laser Collimation: (Not for Cat-Newt 'Bird-Jones' telescopes *)
If you have bought yourself a laser collimator, or you have one and wonder how to use it, I have some advice on how to get the best results.
The user manual will often say someting like...
'Make sure the primary mirror is correctly aligned before using the laser collimator'...
Now, that seems stupid! That's why you bought a collimator isn't it?
Here's how:
There is an explanation of what you are doing at each stage at the end.
First: Fit the collimator to the draw-tube as instructed in the manual, so that the target can be seen from the primary mirror end of the scope. Turn on the laser (Low brightness setting if you have one).
* The Cat-Newt Telescope has a 'corrector' lens in the draw-tube. This stops the laser collimator from functioning correctly. You can use the simple method of defocussed star to collimate a Cat-Newt - Or, you can remove the 'corrector' lens and collimate normally... Not really advised!
I put 'corrector' lens in quotations because it's just a 2xBarlow that tries to get around the main mirror not being parabolic by doubling the focal ratio! Doesn't really work very well. What they are actually doing is magnifying any errors in the mirror by 2. Cat-Newt telescopes are more trouble than they are worth. I would strongly advise you to stay clear. You can tell a Cat-Newt by the fact that it will have a short tube, but a long focal length. You can see visually that it isn't 'right'.
Pic: Cat-Newtonian 114mm.
You can judge that this 114mm telescope is approximately 500mm long by looking at the tube... It says FL=1,000mm - You know there's a barlow in there, causing
trouble! You can't easily use the laser collimator on a BJ. Use the defocus method above.
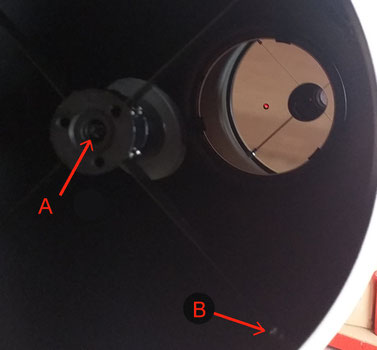
Secondly: Have a look where the laser is hitting the primary. It should be directly in the center of the donut marker on the mirror
(Perfectly in the center of the mirror). If it is not, make careful adjustments to the secondary mirror adjustment screws until it is perfectly centred. Once it is, move down to the primary
adjustment.
See Pic> In the picture you can see the red laser point reflecting centrally in the donut marker on the main mirror. (This is an actual image,
not a mock up!)
Also shown is bolt A which should be firm and not loose. Surrounded by the three secondary adjustment screws as shown earlier.
Also check the bolts B that attach the spider to the tube. These need to be quite tight to tension the vanes of the spider.

Then: Have a look at the 'target' in the collimator and see where the laser is. IF you're lucky it will be somewhere on the
'target'.
If you have the target observation hole pointing toward the primary mirror end of the scope, you can easily see the adjustents you make to the primary.
Next: Carefully adjust the primary mirror adjustment screws to bring the laser into the 'bulls-eye' hole on the target. Carefully, and lightly, tighten locking nuts.
Finally:Check that the laser is still within the donut and the laser hits the bulls-eye. If not, repeat steps and check again. When everything is centralised, you're done.
With practice this process can be done in a couple of minutes. Once you are comfortable with this process you can check the collimation as often as you like or as often as seems necessary.
Explanation of the Collimation Process:
The laser points directly down the center of the draw-tube and is reflected down the telescope tube by the
secondary. The laser dot on the mirror, once the secondary is adjusted so that the laser spot is central on the primary (in the donut), means that the
secondary is directing light exactly down the center of the draw-tube and at the same time directly down the center of the telescope tube to the exact centre of the primary
mirror. Therefore the secondary is now correctly adjusted. By using the primary adjustment bolts to aim the reflection of the laser to the hole in
the target of the laser collimator, you are making sure that the primary mirror's reflection direction is also exactly aligned with the centre of the telescope.
Once the laser beam passes through the optics ( in the case of the secondary, twice) and back to the source (the hole in the target), it means that
the optics are in exact alignment. When you put an eyepiece into the draw tube, the light it sees will pass directly through the centre of the optical train. Collimation is
achieved!